This blog will be about make up tips, suggestions and tutorials for dark skinned teens & women. There will also be occasional hair tips but my main focus will be make up including foundations, eyeshadows, lip glosses, blushes, bronzers, hightlighting & contouring. So all my beautiful black women.......ENJOY. We are no longer left out, DARK SKINNED GIRLS INCLUDED!
WELCOME....................................
Im so glad that you decided to join me today. As stated in the description, this blog is geared towards women of the darker skin tone. Feel free to ask questions and make suggestions. I'm still learning my way around this thing so it might be a little weak at first but I will do my best to do continual improvements. Enjoy.....
Saturday, June 4, 2011
Lady in Red... Red Lip Look(requested).... CHECK THIS OUT!
Okay, okay, okay Farrah I know I have been promising to do this for like two weeks now but better late than never. LOL!
I know most of us are afraid of "the red lip", for whatever reason or the other. I know most dark skinned women think we are too dark and the younger women think it will make us look old fashioned. Lol I know that's why I didn't want to wear it because I was sure it would make me look like my mother. But with time I'm learning that its okay to take risks with makeup. I'm finding the more I take, the more I like it. I have always been a different type of individual when it came to fashion and makeup anyway so jumping out there with red lips cant make matters any worse, lol. So anyway I think if you are brave enough and with the right outfit, anyone can wear a red lip. I don't do the whole club scene and I rarely go out at night so that cuts my opportunity to wear it in half. I'm not one to wear bright colors and red lip stick so that's another cut. I just cant see myself wearing it very often in the spring and summer so that leaves me with fall and winter. Now I'm not saying I would never wear it in spring or summer, I'm just saying the chances are slim. I like to leave those seasons for pinks, oranges, corals and peach lips. Yes, we can wear all those colors on our lips. Fall and winter will be the time that I really get into red and plum lips. Also frosty colors. But since this was requested Ill do it so you can get plenty of practice in now so you will be comfortable by the time fall gets here.
Finding the perfect shade of red for your skin tone can be so tricky. It took me almost two years now to find a shade that I really like and can wear on a regular basis if I wanted to. I think lighter skinned women look good in the more vibrant red lip sticks with pink undertones. Brown skin women look good in blood red lipstick(please use in moderation). Dark skin women look good in red lipsticks with brown undertones. Now how much undertone you want in these shades are up to you but at least you have a guideline. That is not saying that you cant wear any other shades, this is just what I think will look best. Whatever the undertone is I think it would be wise to use a lip liner in that shade family or a little darker and be sure to blend well. For example when I wear my red lip, I use an average or dark brown lip liner. I think it is best to line the lips and with an appropriate shade so you don't end up looking like a pin up girl or a hooker. It tones down the lip stick. Also if you are going to wear a bold lip you should tone down on the rest of your make up. For example, as you will see below, everything I have on other than my lipstick is neutral. I used an eyeshadow that was the same as my skin tone and a very neutral blush and highlight. Actually in these pictures I don't even have on foundation but normally I would wear some. Only get crazy with the eyeshadow and blush if you are going for a really bold dramatic look for pictures or something. You don't want to walk around town looking like a clown. The point of the red lip is suppose to come off sophisticated and sexy. Oh and another thing, NO BLACK EYEBROWS!!!!!!!!!!!!! PLEASE! I am so sick of seeing dark skinned women with these black eyebrows but whatever you do please don't do it with red lips. That will be a hot mess.
Now the way to apply the lipstick is easy yet complicated. Make sure your lips are moist before you put on the lipstick but do not have on any slippery or greasy lip gloss or gellies. You just need moist lips, that's all. If your lips are chapped when you apply the lipstick, not only will you stain your lips but the lipstick will look crumbly and grainy. Just ugly. So once your lips are moist, lightly line your lips with the lip liner of your choice. Do this first. Make sure you do it lightly. You just need a guideline, if you need more liner later you can always go back and apply it. So now take the lip stick and apply it within the perimeter of the liner. Top and bottom lip. Then rub your lips back and forth together to blend the liner and the lipstick so that the transition is seamless. Lastly, I add a very little bit of a none glossy or greasy frosty lip color just to off set the brightness of the red depending on what I'm wearing. Then I blend that also. There you have it. The perfect red lip. This particular lipstick in this picture is Wet n Wild's 506B and I got it at Walgreens for seventy nine cents. So ladies go explore and enjoy....
Finding Your Spring/Summer Fashion Color.... CHECK THIS OUT!
 <<<<<<<<<<<<<<PLEASE IGNORE THE MAKEUP IN THIS PICTURE. I was at the beach and I had a long day. Anyway, this blog entry is about finding your spring/summer color. I know a lot of dark skinned women don't like to wear bright colors because of our skin complexion. The truth of the the matter is, we look great in bright colors and this is the best time of year for us. Now there are all different shades of "dark skin". I personally think I'm definitely on the darker side of dark skin. In the summer,the skin on my body has a red undertone but the skin on my face has a blue undertone. I'm guessing that that has a little to do with my face being exposed to the sun. So although dark skin looks good in any bright color, for the most part,(except emerald green, it leaves us looking washed out) this year I discovered that my spring/summer color is yellow. Different shades of yellow. Last year it was teals and blues. Now I could get into the science of what undertones go with what colors but since every dark complexion is so different my best advice is to just try some stuff on until you find it. Now whatever color you find does not mean that that's the only color you wear this season, it just means it should be your color of focus. I don't have very many pieces of yellow clothing at all but I do play up the color yellow when it comes to makeup and accessories also. This past Sunday I wore dull orange but I wore yellow eyeshadow and I was getting compliments all day on my makeup. Even experiment a little with nail polish. Now in case you are new to this I have posted pictures of color ideas below for darker skin tones. Teals, Blues, Yellows, Oranges and Pinks. Also pink/orange blends look good on us, like coral and peach. These are all colors you have to try up against your own skin tone. Even if it looks good on someone else it may not work for you. An example is, my cousin Farrah and I aren't too far from being the same skin tone. My color for this season is yellow and I personally think hers is any color in the orange family. The bright oranges aren't looking too good on me right now. I can pull it off, I'm sure, but definitely not as good as I could do yellows. What may work for her may not work for me. So go through your closet, or even visit your nearest clothing store. Experiment with color matching. Find your color and put your best fashion foot forward this summer. Enjoy...................................
Revlon Custom Creations Foundation....Product Review.... CHECK THIS OUT!
I love Revlon products but I must say that I have mixed feelings about this foundation. I guess I will start with all the bad stuff first. Well, no, I'll start with the good stuff. I love the idea that this foundation has different settings so you can custom choose your shade. I think it is genius. I love the packaging. The pump is not messy at all and it is very convenient. Also, the quality of the foundation itself is the same as any other Revlon foundation that I have tried. Leaves skin looking natural. Now as for the bad stuff, I have a mouthful to say. Starting with the fact that the settings on the bottle do not match the colors in the bottle. I have this bottle in the shade Deep, which by the way, is the darkest shade they have in this particular collection. If you look at the settings on the bottle it looks as if its a pretty close guesstimate of darker skin tones. The problem is none of the colors on these settings match the colors that come out. It is way lighter than what it should be on every setting. Anything under a 5 can only be used for bright skin tones or tanned white skin tones. Even with it on the number 5 setting it is only a match for a brown skin tone so although the Deep is suppose to be for darker skin tones it is not and would be a total waste of money. Well if you aren't really dark like me, maybe you can get away with using the number five setting if you blend it really well but I'm afraid that it will leave that ashy look. Revlon was way off with the color selection this time. But if you are brown skinned, light skinned or tanned this will probably work great for you. The price of it is about fourteen dollars. You can purchase it CVS, Walmart or Walgreens. Prices may vary. Enjoy................
L.A Colors Professional Brush Set... Product Review...CHECK THIS OUT!
I have a lot of brushes. More than I can keep up with but I definitely need more. I'm not picky at all when it comes to the cost of makeup brushes but I definitely want more for my money. I will use the most expensive to the least expensive as long as they work. The product review for today is going to be on the L.A. Colors Professional brushes. I only have two from the set. I have the powder brush and the blush brush. The hairs from these brushes are synthetic. Considering the fact that they are so cheap, they are also very soft. I have not washed them yet but I have already experienced a little shedding. Which is the reason why I am afraid to wash them. They work pretty good, I guess. The big one is a powder brush but I do not use it for my face powder. It is not the best at blending and I'm afraid it will leave my foundation sitting on top of my skin. So I use the big brush for my highlight for my cheek bones and I use the blush brush for blush. It works out just fine, in my opinion. When it comes to foundation brushes for your face you want good quality brushes for the sake of blending so I would only use these for my cheeks and maybe bronzers. I haven't seen the eyeshadow brushes anywhere but if they are made like these brushes I think they would work very well for the use of eyeshadow. You can kinda get away with cheap brushes for your eyeshadow a little better than you can with foundations. Also let me add that I love how sturdy the brushes are made. They look really professional as opposed to some other inexpensive brushes that I've seen. These brushes were two dollars a piece at Family Dollar. For two dollars it was worth the price. Since I got them they are the only brushes that I use for my highlight and blushes. So check them out ladies especially if you are a beginner. Enjoy......................
Friday, June 3, 2011
Sensodyne Pronamel Toothpaste...Product Review....CHECK THIS OUT!
When it comes to beauty we tend to focus on the obvious like covering up gray hairs, making sure our eyebrows are neatly groomed or making sure our belts match our handbags and shoes. But the things that we dont think about as much also play a big role. Things like bright eyes and white smiles. About two weeks ago I was asked to sample Sensodyne's Pronamel toothpaste. I was more than excited to do this because this toothpaste is also for sensitive teeth. Let me tell you, I love this toothpaste. Not only have I noticed that my teeth arent as sensitive but they are so much whiter and brighter than before. It wears away wine, fruit and soda acids that may occur over the years that we dont even notice. Just beautiful. The one negative that I did notice is that it has somewhat of a bleach smell. Even with the mint smell. Its not such a big deal though that you cant use it. This toothpaste can be found at CVS and I am uncertain of the price since I was asked to sample it but when my samples run out I do plan to make this my new toothpaste of choice. Ladies enjoy.................
photo being edited.........will be reposted later this week....
Creme of Nature...Product Review.... CHECK THIS OUT!
This is a product review for Creme of Nature coloring system. Although Clairol's Textures and Tones is my first choice for an at home box color( I will also do a review for this brand in a few weeks), I really did like Creme of Nature's coloring system. It was very easy to use. It worked very quickly. Also the color turned out vibrant. The only negative thing that I can say is that the smell wasn't good at all. In fact it left me with a little bit of a headache but that could be because I haven't eaten today. Also I noticed that a lot of times coloring hair makes the hair texture feel different but that wasn't the case with this brand. So if you are coloring your hair yourself at home, this is a brand that I definitely recommend. It runs about five dollars a box at your nearest beauty supply store. The color was bronze copper. Below are pictures of the results. They are a little different than what is shown on the box but that is because the client had verrrrrrrrrrrrrrrrrrry blond hair before we used this coloring system. She wanted it really light. It still turned great. Alright ladies enjoy.................
Thursday, June 2, 2011
Sephora Lipgloss..... CHECK THIS OUT!
I consider myself to be pretty well educated in the area of chapsticks and lip glosses. I love lip gloss. I have found a lot of lip glosses that did not work for me but this one had to be the worst ever. I try not to give bad reviews but I would be lying if I told you that this was good lip gloss. The colors are beautiful but that's about the only thing. This lip gloss does not last more than an hour before it feels like I need more. The formula is very thin and the texture of it is uncomfortable. Almost sandy or gritty. I don't expect any product to be perfect but after a few days of trying this gloss I can honestly say that I hate it. If it was my money that paid for it I would have gotten my money back. This lip gloss was six dollars a tube. Oh by the way, even the packaging seems cheap. Now you may feel differently so if you want to try this lip gloss it can be found at Sephora and it is the Sephora brand. All of this is just my personal opinion. I would say enjoy but.............................well that's up to you lol.
Bronzer and Highlight....NYC....... CHECK THIS OUT!
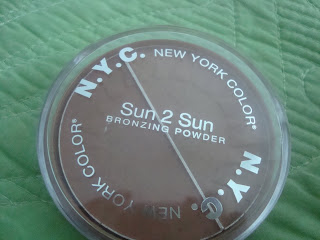
I have always been really into my eyes and lips. I love eyeshadow and I love lipgloss but now I have a new mini obsession. I never thought I would be into it but I now have a thing for bronzers, blushes and highlights.Of course, I cant speak on all three of them in this blog entry but I do want to inform you of my new favorite item. New York Color's Sun 2 Sun bronzing powder. I lovvvvvvvvvvvve it. I, once again, kinda stumbled upon this product but once I started using it I decided to do a little research. I found it on a few reviews on YouTube and I discovered that any skin complexion can use this. It also can be used in several different ways. I don't like bronzer all over my face so most of the bronzers I own, I use them all for different reasons. This bronzing powder comes with two different colors inside so I use the light side as a hightlight and the dark side as a blush. Perfect combo for someone with a dark complexion. I use it everyday even when I am not wearing foundation. But highlights and blushes are very important, ESPECIALLY WHEN YOU ARE WEARING FOUNDATION. They keep you from looking so washed out and they add dimension and light to your face. So if you don't wear blush, bronzer or a hightlight and you want to start small then start here. I don't know if they have other shades since this is the only one I have seen but the shade for this one is Terracotta Tan 719A. I think I only paid a dollar for this because it was on sale but the original price is like three dollars. You can purchase this at CVS or Walmart. Ladies please give this product a try. Enjoy.......................
Wednesday, June 1, 2011
~Handbags by Trese~ CHECK THIS OUT!
Below is a picture of this week's featured handbag of the week. This handbag is not really a handag, its more of a shoulderbag and it too was also made out of a shirt. The camera isnt really picking up the color but it is indeed a beautiful bag. I love it. The shirt was from Forever 21 and the price to have the bag made was ten dollars. If you are interested in having a bag made please contact Trese on facebook by the search name Trese Brunson. Enjoy...................
Protective Styling................. CHECK THIS OUT
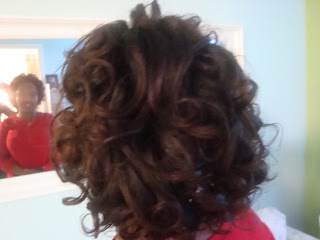
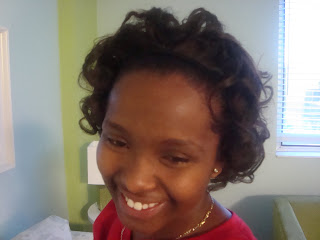
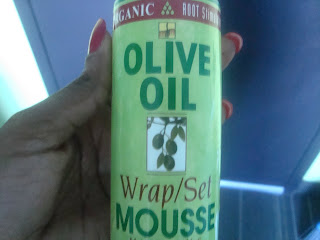
One really good way to avoid a lot of heat damage to your hair is protective styling. Protective styling is anything that doesn't require you to touch or style your hair everyday such as ponytails, buns, braid outs and roller sets. I am currently still wearing braids but I wanted to begin to show you alternatives to wraps. So the protective style below is a simple overnight rollerset. No hair dryers involved. You can achieve this look by using about 20 big foam or satin rollers and a little wrap lotion. Divide the hair into four sections. Then part the hair into sections to add the roller. While doing this, only add a little wrap lotion. You don't want the hair wet, just damp. Sleep in the rollers overnight then in the morning remove them. Depending on how tight you rolled the hair, wet your hands and finger tips and style the hair by running your fingers through it and finger combing the curls. In this case, we added a head band but normally I pin up my sides or do a hump in the top. Maybe two big twists... it depends. Because curls are soft, it is up to you to decide how you want to style them. But this protective style can last you up to a week depending on the upkeep of the curls. Supplies for this can be found at your nearest beauty supply store. If there isn't one near you, most Walmarts and Dollar Stores will carry these items. Alright ladies enjoy......................
Sunday, May 29, 2011
Seeing Red............NYC Nail Polish Review CHECK THIS OUT
So I wanted to try something different after that horrible color I had on last week so I decided to try NYC's quick dry nail polish in the shade Madison Avenue. It doesn't show up well on the picture but I am in love with this color. Its a red color with pink undertones, I think. It looks red but to me when you really look at it it looks kinda pink.Its perfect. I had to do like two or three layers(I can't remember) but it turned out nice. It is quick dry just as advertised also. Overall I have nothing but good things to say. I purchased this at CVS for like .49 cents but I think original price is two dollars. So check out NYC's quick dry polish ladies. Enjoy.....................
Project Makeover................... Haircut. CHECK THIS OUT!
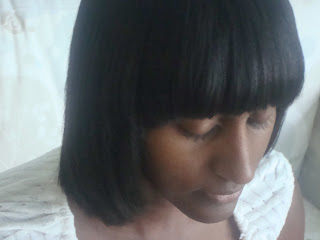
This is a first time client who really wanted a haircut. For some odd reason I totally forgot to take a before picture but I decided that I would post the results anyway. I cut about two and a half inches off of her hair(by request) and added bangs(by request). Turned out really pretty not to mention she has a beautiful head of hair. Pics of the finished product are posted below. If you are thinking about getting a hair cut similar to this, just ask the stylist for a long soup bowl look with light layers in the top. This is very easy to manage by simply wrapping hair at night and bumping the ends with a flat iron once a week. Enjoy.............
Subscribe to:
Comments (Atom)


